3rd day of studying Illustrator. I covered 7 chapters out of 31. However, in this book the shapes start in chapter 6 and Pencil, Paintbrush, Blob Brush tools are introduced in chapter 7. I got really bored and just wanted to finally make something. I had some experience with vector graphics and was pretty good at Corel Draw back in the day so I decided to put the book away for a bit and just get some practice.
I'm decent at drawing on paper and usually when I need a cartoon drawing I sketch it, take a photo, open the photo in Photoshop and basically re-create it. Yes, I'm fully aware that Photoshop is a bad choice for that but up until now I got by since I didn't do it too often. Now since I was in dire need of getting better I decided to take it to the next level, put programming aside, and study Illustrator.
The book explains tools but not when and how to use them. I concluded that shapes are great for creating cartoons. It's just like drawing - you start with basic shapes like circles and rectangles, build the graphic then tweak the curves and bring the look to senses through modifying curves. It's really neat since your shapes are perfect from the beginning and when you adjust curves it's much more precise and smooth then you would ever get by doing it with hand.
 This is my piggy bank that's sitting on my desk. I used the Pencil tool (against my better judgment of using shapes). Then I adjusted the curves. All shapes are closed (except obviously the green squiggly lines). The flowers were the fun part. I made 5-hand Stars, selected all the anchor points and converted them to curves, then modified them as needed to give them the warped look as if they are on the surface. The background is done with the Blob Brush. The body has 2 fills - a solid color and a gradient in Screen blending mode. I don't really know the gradients in AI yet and I'm hoping there are more options hidden somewhere. I'm used to being able to drag the gradient wherever I want in PS which I haven't figured out yet in AI.
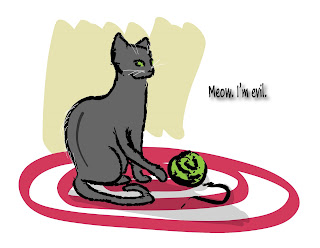 I picked one of the Art brushes for the Paintbrush tool and drew with the stylus. Takes some getting used to but It's actually really good for this kind of work. Then I switched to Draw behind mode, picked the Blob Brush and colored the cat. All of that was pretty easy and quick to do. I couldn't get the beige background right though. I must have redrawn it a 100 times and recolored it that much too.
I'm decent at drawing on paper and usually when I need a cartoon drawing I sketch it, take a photo, open the photo in Photoshop and basically re-create it. Yes, I'm fully aware that Photoshop is a bad choice for that but up until now I got by since I didn't do it too often. Now since I was in dire need of getting better I decided to take it to the next level, put programming aside, and study Illustrator.
The book explains tools but not when and how to use them. I concluded that shapes are great for creating cartoons. It's just like drawing - you start with basic shapes like circles and rectangles, build the graphic then tweak the curves and bring the look to senses through modifying curves. It's really neat since your shapes are perfect from the beginning and when you adjust curves it's much more precise and smooth then you would ever get by doing it with hand.
 This is my piggy bank that's sitting on my desk. I used the Pencil tool (against my better judgment of using shapes). Then I adjusted the curves. All shapes are closed (except obviously the green squiggly lines). The flowers were the fun part. I made 5-hand Stars, selected all the anchor points and converted them to curves, then modified them as needed to give them the warped look as if they are on the surface. The background is done with the Blob Brush. The body has 2 fills - a solid color and a gradient in Screen blending mode. I don't really know the gradients in AI yet and I'm hoping there are more options hidden somewhere. I'm used to being able to drag the gradient wherever I want in PS which I haven't figured out yet in AI.
Then at the end of the chapter it was advised to use a stylus pen for work with Pencil, Paintbrush, and Blob Brush. Ironically, I just uninstalled the drivers and put it away. I wanted to skip over that part but as usual felt guilty for not doing every step and reinstalled the stylus.
 I picked one of the Art brushes for the Paintbrush tool and drew with the stylus. Takes some getting used to but It's actually really good for this kind of work. Then I switched to Draw behind mode, picked the Blob Brush and colored the cat. All of that was pretty easy and quick to do. I couldn't get the beige background right though. I must have redrawn it a 100 times and recolored it that much too.
I LOVE the Blob Brush tool. It's like having markers with endless ink that also don't have the overlapping lines that I hate so much.
And the Draw Behind mode is excellent. It's kind of like I color on the paper too - starting with the small details and slowly working my way to the background (yes I know I'm doing it backwards). But this mode is perfect for that. That feature in general is amazing and makes life a lot easier since you don't have to waste time on rearranging the objects.
And of course knowing the hot-keys dramatically increases the speed of everything. It is an investment of time but it pays off very quickly. I don't try to memorize everything at once but force myself to only use hotkeys for whatever I'm doing - if I don't remember the key combination I look it up in my copybook where I write them down as I cover content from the book.
Another time investment that immediately pays off is learning Bridge. It's as important to anybody working with graphics as source control is for programmers. I had Bridge forever but I never bothered to actually learn it until today. I had looked at it before but didn't get excited about it because I didn't know about stacks, smart collections, and the way keywords are done. Everything is within your fingertips, you don't need to manually categorize your photos/graphics and might as well just dump them in one folder, unsorted. Labels are great, too - you can mark something as Approved, To do, rejected, etc. and it will visually color-code the space between filename and thumbnail. Stacks let you group up similar photos so that only one of them shows but if you click on it you will see all the files in a stack. It's a really powerful tool - much better than Picasa or anything else I've encountered so far. And it comes free with PS or AI (nice surprise from Adobe).
No comments:
Post a Comment